

Proudly welcome invited (or unexpected) guests to your home with a fresh, seasonal approach to curb appeal. A seasonally decorated mailbox takes less than a weekend to complete and is the perfect way to set the mood as soon as visitors arrive.
No matter the holiday, taking the extra time to decorate your mailbox will bring you joy every time you arrive home. With just a few items available at your local Home Depot, you can transform your plain mailbox to a welcoming showstopper and be the pride of the neighborhood.
To create your own festive mailbox display, follow the simple step-by-step instructions below.
Thanksgiving Bounty Mailbox Decorating
Your family will be so impressed when they pull into your driveway on Thanksgiving and see this mailbox. It’s an easy project to put together and doesn’t require many materials. Add your own personal touch to this project by using different colored pumpkins or leaves.
WHAT YOU NEED FOR THIS JOB
SKILL LEVEL: Intermediate
TIME: 1 hour active time
COST: $50-$75
TOOLS
● Screwdriver
● Scissors
● Green Floral Wire
MATERIALS
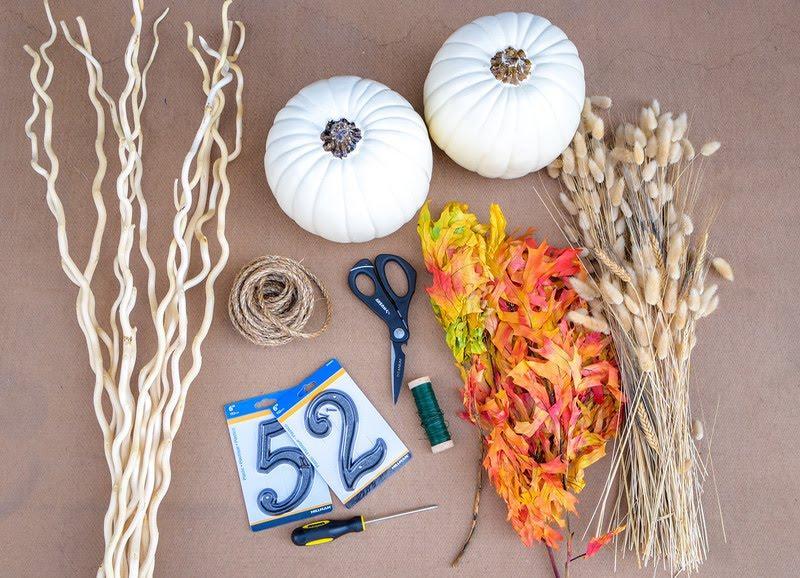
● Gentry All-in-One Plastic Mailbox and Post Combo in Mocha
● 3 large faux white pumpkins
● Black house numbers
● 1 cornstalk, or tall dried branches
● 1 dried wheat bundle
● 2 bunches multi-colored dried, or faux, leaves
● 3 – 3” adhesive backed Velcro strips, additional as needed
Step 1: Number the pumpkins
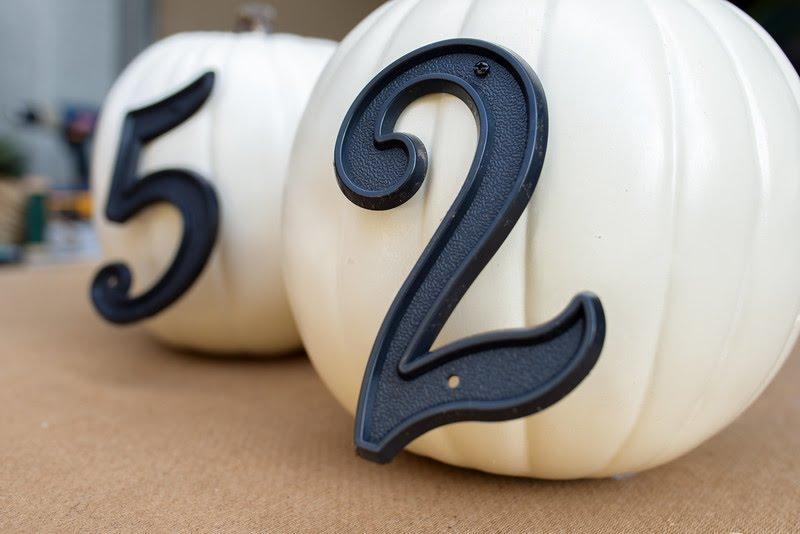
Line up house numbers on each faux pumpkin and screw in using screwdriver.
Step 2: Attach the branches
Place corn stalk or dried branches vertically against the mailbox post making sure the top of the stalk reaches above the top of the post. To secure, wrap green floral wire around branches and mailbox post.
Step 3: Add texture to the post

Tuck wheat sections and dried leaves into the stalks to cover the floral wire and add volume and a texture layer.
Step 4: Secure the pumpkins
Cut Velcro strips in approximately 3-inch sections. Remove protective backing and affix to the top flat side of your mailbox. Repeat onto the base of your faux pumpkins with the opposite side of the Velcro strip. Line up pumpkins to read your house number and stick Velcro strips together. Feel free to get creative if you have a long house number and need to move some of the faux pumpkins onto the mailbox post.
Step 5: Tuck in leaves for final touches
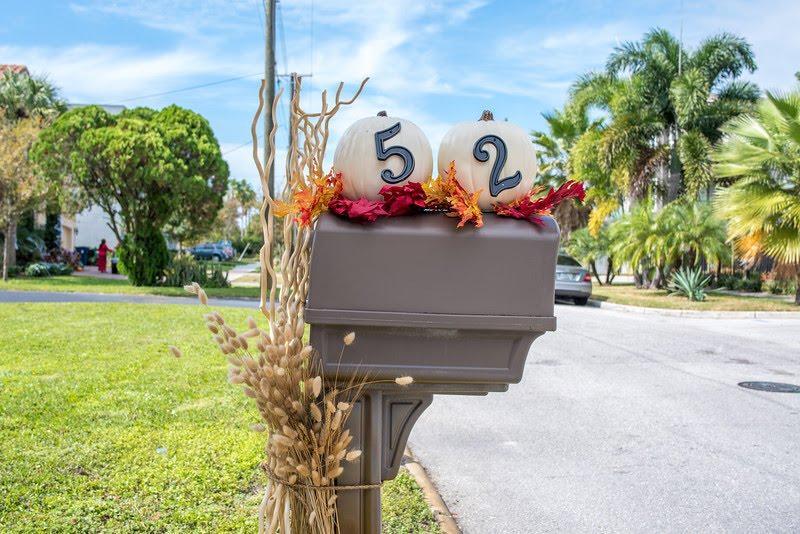
Once the pumpkins are in place, tuck additional leaves and wheat stalks underneath the bottom and sides to recreate a pumpkin patch on your mailbox.
Decorating Your Mailbox for a Festive Christmas Season
Instead of wrapping your mailbox in Christmas lights this year, why not try something different? You can add a classic touch to your mailbox simply by adding a hanging sign to it. You can personalize the design further by using different colors of paint for the letters and background. Not only is this festive mailbox inexpensive to put together, but it will be sure to impress your neighbors.
WHAT YOU NEED FOR THIS JOB
SKILL LEVEL: Intermediate
TIME: 2 ½ hours, not including time for paint and glue to dry
COST: Less than $75
TOOLS
● Thin paint brush
● Glue gun
● Glue sticks
● Scissors
● Drill
● Drill Bits, various sizes
● Garden clippers
● Green floral wire
● Protective tarp, or newspapers
● Pencil
● Measuring tape
MATERIALS
● Elite Standard Galvanized Steel Post-Mount Mailbox
● 1 – 24” x 24” smooth wooden board
● White spray paint
● Stencil letter kit
● Gold paint
● 2 Brass hooks
● 1 reel heavy twine roping
● 1 reel of burlap ribbon
● Cut Fresh Greens – pine, magnolia or similar
Step 1: Mark the holes to drill
With a pencil, mark off two holes to be drilled on the square board – 5 inches from each side and 2 inches from the top.
Step 2: Drill the holes
Once marked, drill a hole large enough for your twine to go through.
Step 3: Paint the board
Spray paint the board white and let dry overnight. Repeat on other side.
Step 4: Attach the brass hooks
Cut a length of the twine approximately 8-inches long and insert one into each hole. Loop the twine through the fixed end of the brass hook and pull twine until the ends are even. Using the glue gun, apply a thin line of hot glue on the ends and twist to secure them together, forming a loop. Allow to dry. Cut the ends as needed.
Step 5: Stencil your message
Once the board has fully dried, place stencils on the board and trace the letters with a pencil to create the desired message.
Step 6: Paint your message
Using a thin paint brush, paint the letters with the gold paint and allow to dry overnight. Repeat on other side if both sides will be visible.
Step 7: Hanging your sign
Collect all your elements and bring them out to your mailbox to decorate.
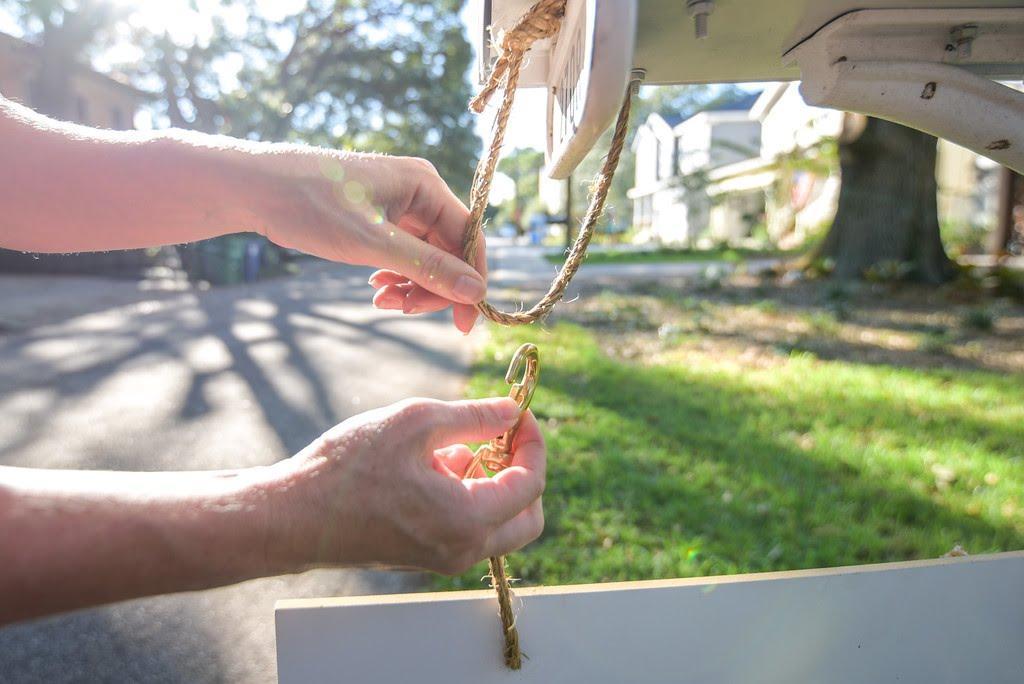
Thread the heavy twine pieces through a space underneath the mailbox post; you will need to do this twice, once in front and once in the back. Tie the twine so that the brass hooks can hang on them and the painted square sign will hang straight. Adjust lengths as necessary.
Step 8: Add the greenery
Once the sign is hung, attach your fresh greens to the hanging sign using green floral wire. Tuck additional pieces between the mailbox and post to add height and fullness.
Step 9: Put a bow on it
Cut a long section of the burlap ribbon and tie a loose bow. Use a section of green floral wire to secure it to the greens and post.
Step 10: The finishing touch
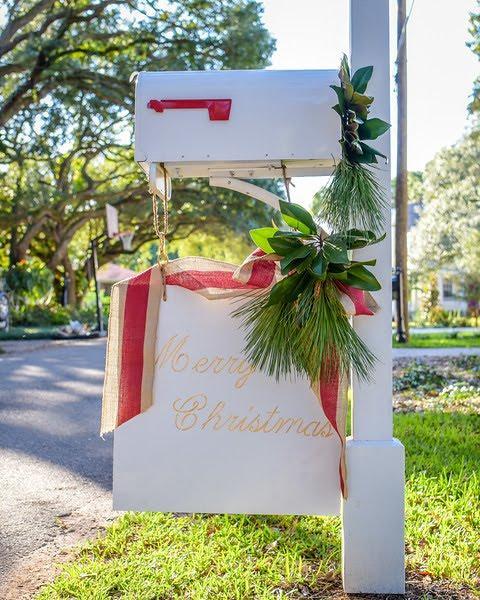
Finish by draping the burlap ribbon around the sign, put on “Jingle Bells” and get ready to welcome holiday carolers!
Easter Mailbox Decorating Project
Decorate your mailbox for Easter this year with this lovely spring project. Not only is it easy to do, but it won’t take up much of your time. Experiment by painting your mailbox or buying different colored birds to really make this project your own.
WHAT YOU NEED FOR THIS JOB
SKILL LEVEL: Beginner
TIME: 1 hour active time, not including drying time for paint
COST: less than $85
TOOLS
● Protective Tarp, or Newspapers
● Garden Clippers
MATERIALS
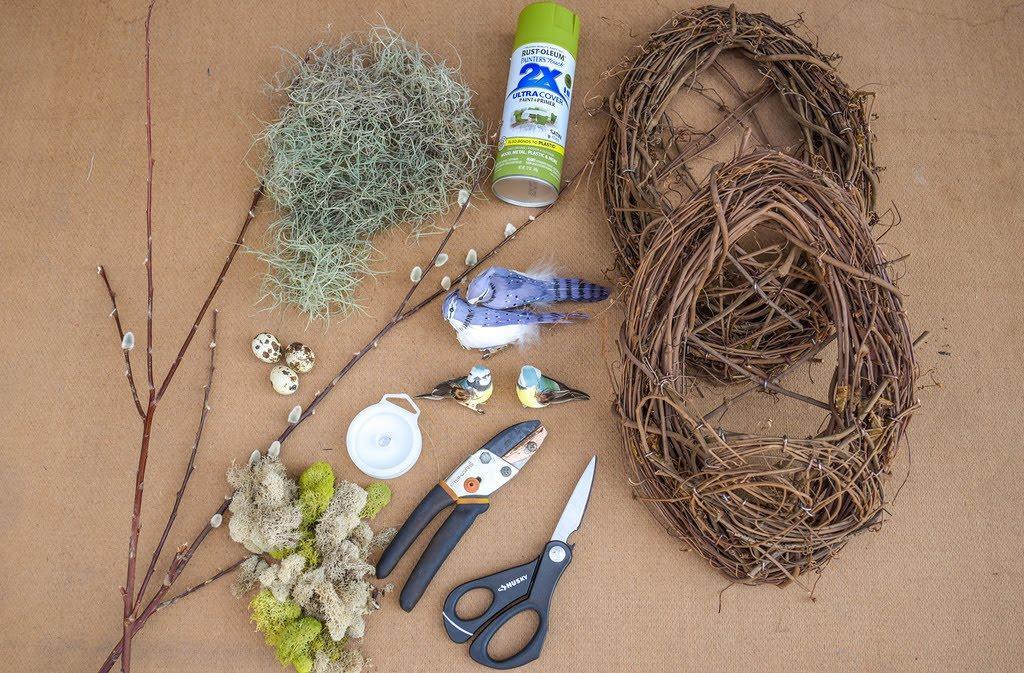
● Elite Standard Galvanized Steel Post-Mount Mailbox
● Green spray paint
● Spanish moss
● 2 grapevine baskets – two, flat back works best
● 1 package preserved moss, variety of colors
● 2 – 3 Pussy willow branches
● 4 faux clip on birds
● 6 faux eggs
● 1 reel clear fishing line
Step 1: Paint the Spanish moss
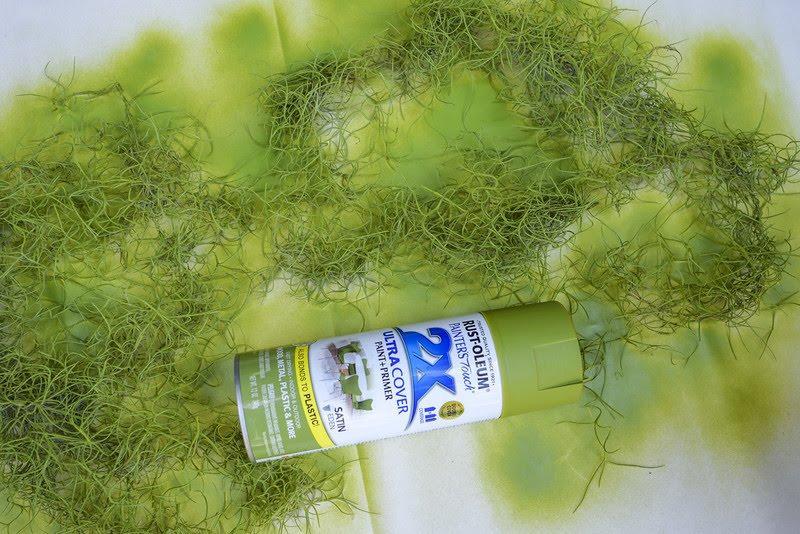
Place half of your Spanish moss onto the tarp, and use green spray paint to cover it. Allow it to dry for at least one hour.
Step 2: Create the base for your nest
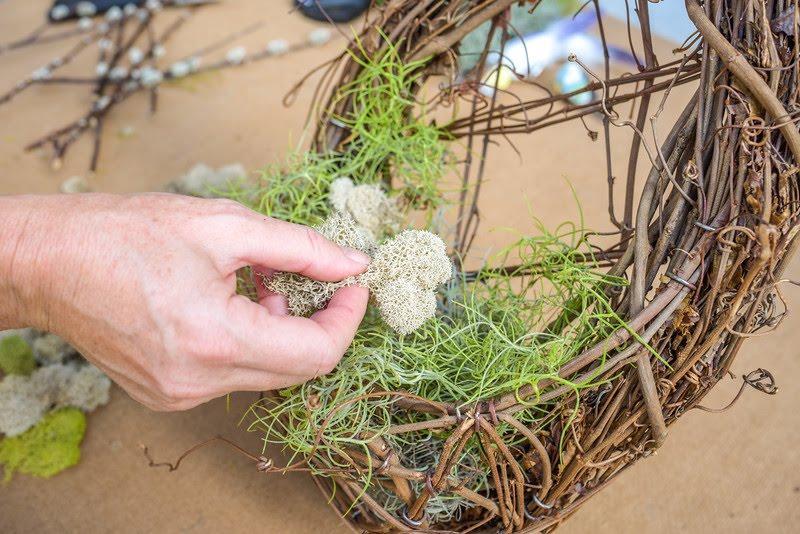
Assemble your bird’s nests by placing a combination of the natural and painted Spanish moss. Then top it with the gray and green preserved moss.
Step 3: Add the branches
Once your moss is in place and secure, begin to cut the pussy willow branches into sections that will tuck nicely into the basket but still reach out beyond the edges of your basket.
Step 4: Place the birds
Add two fake birds to each basket by tucking one bird into the nest and clipping the larger bird on top to watch out over the nest.
Step 5: Gently add the eggs to the nest
Add three faux eggs to each nest. Group them together in a cluster just as you would see a mother bird protecting her own eggs.
Step 6: Hang your nests
Once all your prep work is complete, bring your supplies and nests out to the mailbox. Cut a piece of the clear fishing line long enough to loop through each basket on either side and tie into a knot on top. Move the top knot to hide underneath one of the baskets and arrange both equally in the center of the mailbox on each side.
Step 7: Adjust as needed
Reposition the elements as needed once in its final placement.
Creating a Patriotic Mailbox Display for Fourth of July
Ring in the Fourth of July with this patriotic mailbox display. For this project we used red, white and blue spray paint, wooden stars, twine and wooden garden edging. You’ll have the most patriotic mailbox in the neighborhood in no time.
WHAT YOU NEED FOR THIS JOB
SKILL LEVEL: Intermediate
TIME: 2 hours, not including drying time for paint
COST: Less than $60
TOOLS
● Garden clippers
● Scissors
● Green floral wire
● Pliers
● Glue gun
● Glue sticks
● Protective tarp
● Newspapers
● Plastic gloves
MATERIALS
● Elite Standard Galvanized Steel Post-Mount Mailbox
● 4 – 6 wooden stars
● 1 – 2’ section wooden garden edging
● Red spray paint
● White spray paint
● Blue spray paint
● 1 roll blue painters tape
● 1 reel heavy twine
Step 1: Paint the stars
Begin by spray painting the wooden stars white on both sides, making sure to protect the surface you are working on by covering it with newspaper or a tarp. Let the stars dry for at least one hour or overnight.
Step 2: Prepare to paint the firecrackers
Place the wooden garden edging on a protected surface. Cut newspaper in sections large enough to cover two wooden blocks at a time. Tape each newspaper piece down to cover two wood sections leaving every third block exposed to be painted.
Step 3: Paint the firecrackers
Spray paint the first and every third block red. Give the paint time to dry (approximately 20 minutes). Gently move the paper and reposition it to expose the next set of blocks to be painted, again covering every third block to be painted.
Step 4: Repeat and paint
Repeat with blue and white spray paint until all blocks are painted. You may need to apply two coats of paint. Allow blocks to dry overnight.
Step 5: Cut and glue the wicks
Cut 3- to 4-inch sections of heavy twine for each block in your line; this will become the wick for each block. When the wooden blocks have fully dried, turn them over so the back is facing up. Glue each small section of twine to the back of each block until the entire row is complete.
Step 6: Add the stars
Turn the blocks back over; this will help put pressure on the glue and ensure a tight hold. Now glue the white stars to red or blue blocks in an alternating pattern. Collect all your completed décor items and bring them to your mailbox to decorate.
Step 7: Attach your wooden firecrackers
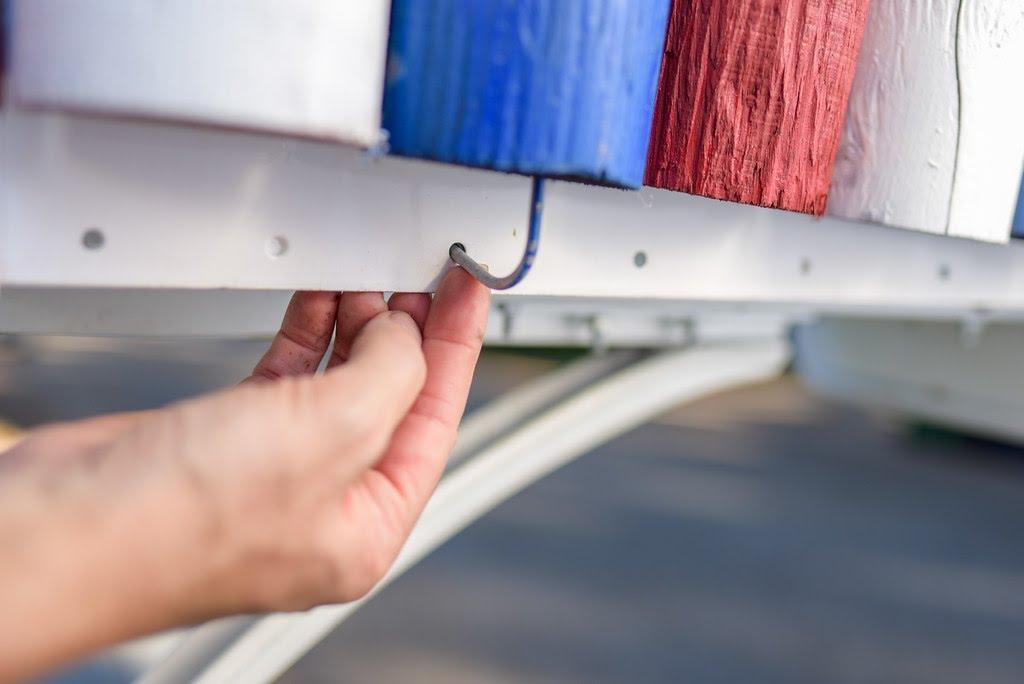
Most mailboxes have a line of holes along the bottom of them so they can easily be attached to the type of post you will use. These holes come in handy during this project, as the posts for the garden blocks fit perfectly inside them and allow the row of blocks to float on the outside of the mailbox.
Using a set of pliers bend the post at a right angle toward the back of the finished blocks; this will serve as your new post. Simply slide this post into the holes in the base of the mailbox. Cut your length of blocks to fit.
Step 8: Add your final touches
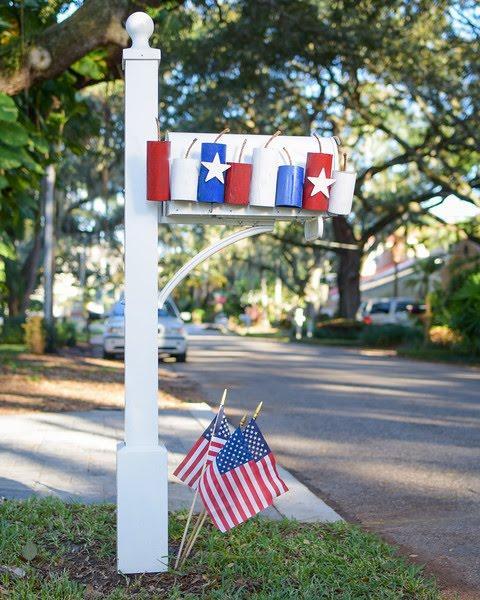
Add a few free standing flags to the bottom of your post if desired and your Fourth of July mailbox is ready to celebrate.
Spooky Halloween Mailbox Decorating
Give your mailbox a macabre makeover this Halloween! Using. All you need are a few materials, along with your mailbox, and you’ll be set to create a ghoulish display guaranteed to spook your neighborhood trick-or-treaters.
WHAT YOU NEED FOR THIS JOB
SKILL LEVEL: Intermediate
TIME: 1 hour active time, 3 hours including drying time
COST: less than $80
TOOLS
● Green floral wire
● Household scissors
● Protective painting tarp
MATERIALS
● Lincoln Decorative Plastic Post-Mount Mailbox
● White spray paint
● Adhesive Velcro tape
● Spanish moss
● 2 faux black crows
● 6 faux spiders
● 2-3 faux mini pumpkins
● 1 bunch faux black leaves
Step 1: Paint your mini pumpkins
Select your mini orange pumpkins to paint white, remove any faux stems or leaves and set aside to replace after painting. Place pumpkins on protective tarp and spray paint white. You can leave a few orange for variety if you like. Spray all sides and leave to dry about one hour minimum, then replace stems or leaves.
Step 2: Prepare the crows
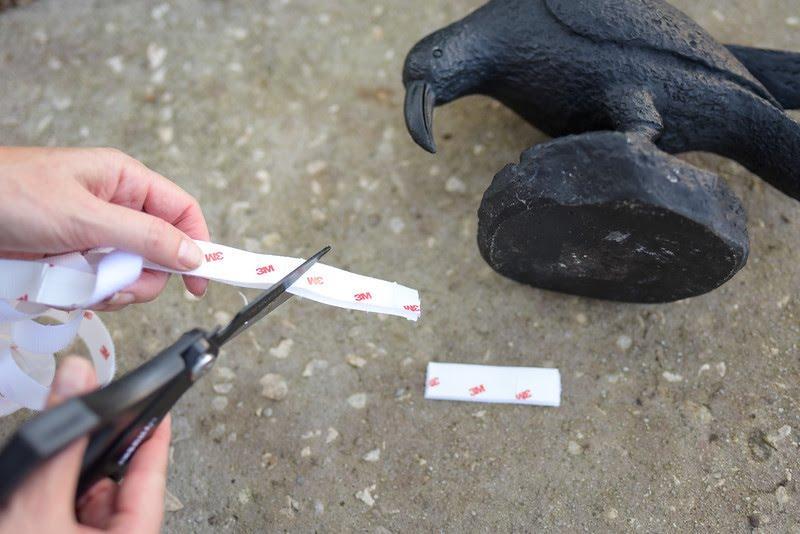
Cut the adhesive Velcro tape in 3- to 4-inch pieces and attach to the bottom of each crow’s base.
Step 3: Attach the crows
Remove the protective strip on the adhesive Velcro and secure the crows the top of the mailbox. You may need to use several sections depending on the weight of your crows.
Step 4: Add the Spanish moss
Working in small pieces drape the Spanish moss on top of the mailbox between the crows; allow some pieces to fall over the edges lower than the mailbox itself.
Step 5: Add in your pumpkins
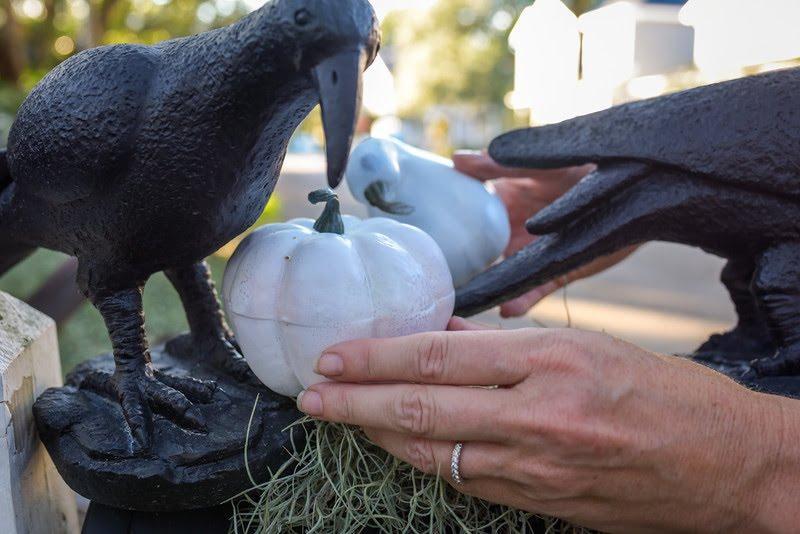
Add the pumpkins on top of the moss, tucking them in under the crows using Velcro strips as needed to secure them in place.
Step 6: Add texture with leaves
Cut the black leaves in small sections containing 4-5 leaves per section. Tuck in pieces of the leaves into the moss and around the crows and pumpkins to add another layer of texture.
Step 7: The final touch
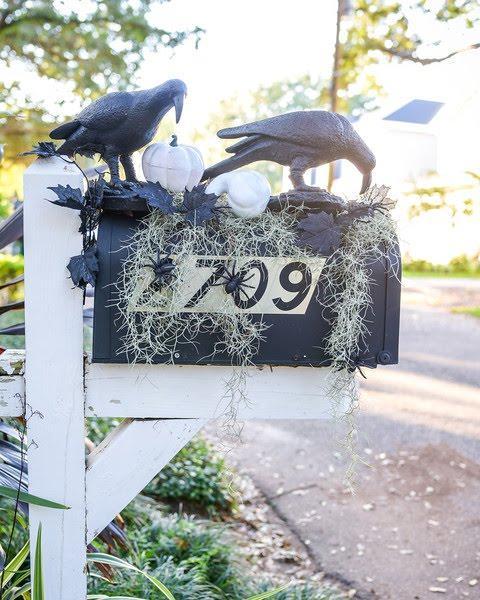
As a final Halloween touch, add the plastic spiders to the display. They will easily cling to the moss and give any trick-or-treaters a fright!

2 Comments
These mailbox decorating ideas are wonderful! Thanks for sharing!
I love this idea!!! I delivered mail for 11 years and this is great!